With autumn nearly upon us — although it’s a month or so away — this is the perfect time to start planning a Halloween party and maybe think about some Halloween baking.
I found a biscuit recipe courtesy of The Biscuiteers a few years ago.
I’ve used it for all sorts of iced cookies; from easter biscuits to edible Christmas decorations.
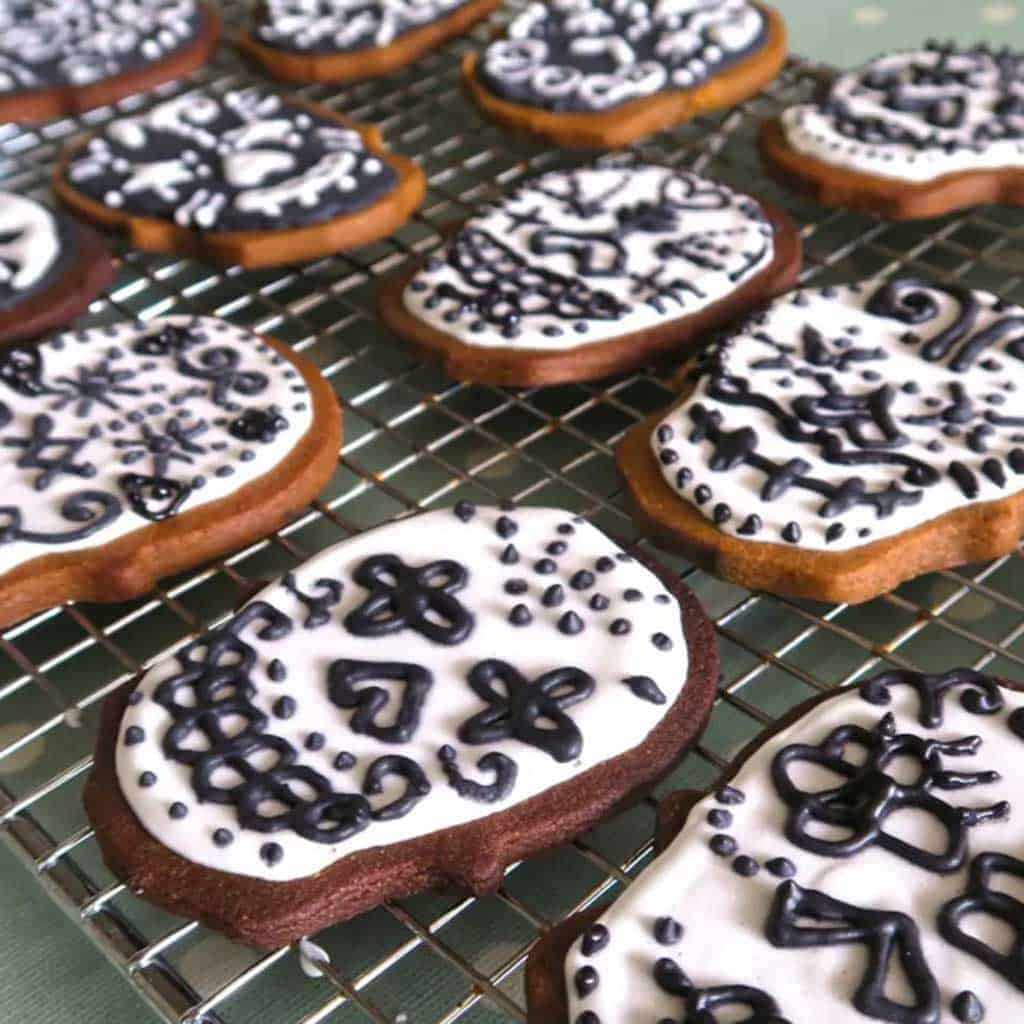
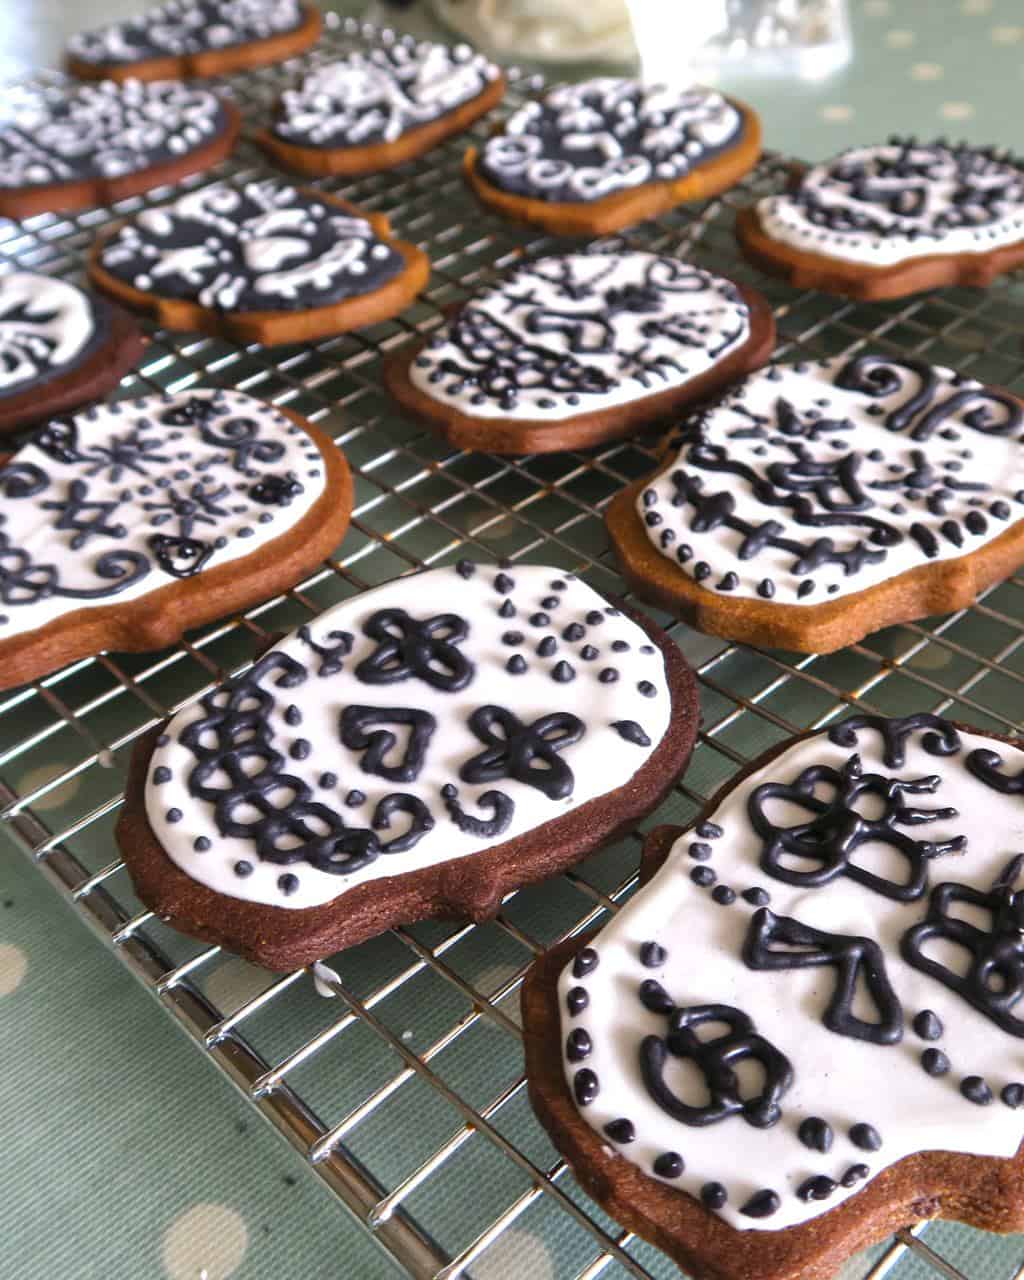
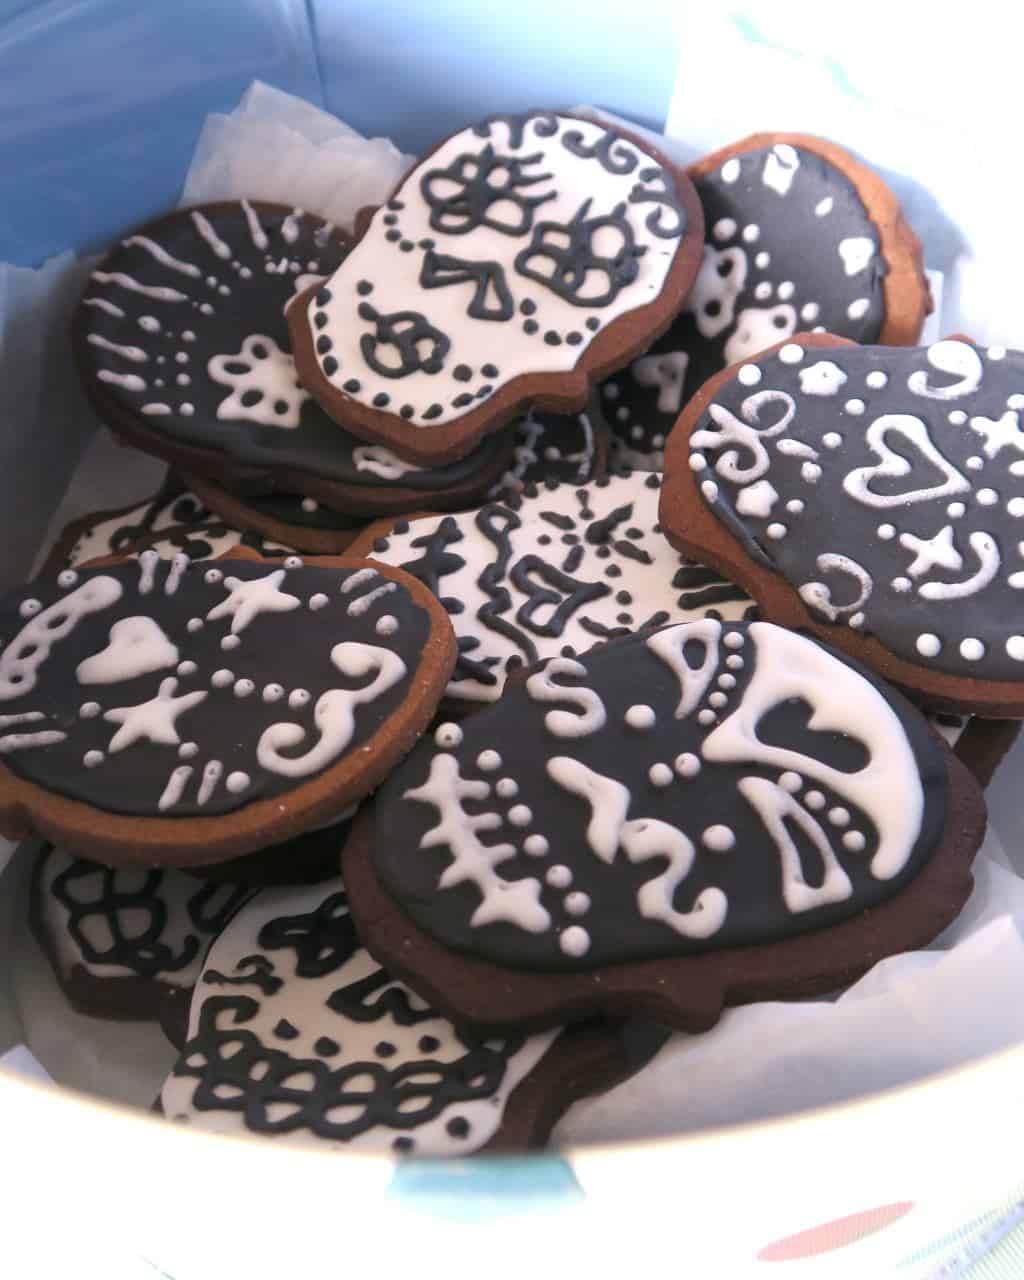
But, of all the biscuits I’ve ever made, these iced sugar skull cookies are still my absolute favourite.
You can read the original recipe here. It’s super easy to make and the biscuits taste delicious.
Quick View of What You'll Find on This Page
How to make iced Sugar Skull cookies
You will need:
200g plain flour
½ teaspoon baking powder
half a teaspoon ground ginger
½ teaspoon cinnamon
half a teaspoon mixed spice
100g salted butter softened and diced
50g black treacle
1. Preheat the oven to 170C/150C fan/gas 3 before you begin making your iced sugar skull cookies or when ready to cook. I made 14 skulls — plus a tester biscuit!
2. Sift the flour, baking powder and all the spices into a mixing bowl. Add the sugar and mix well.
3. Add the butter. Using just the tips of your fingers, rub the ingredients together until they resemble fine breadcrumbs.
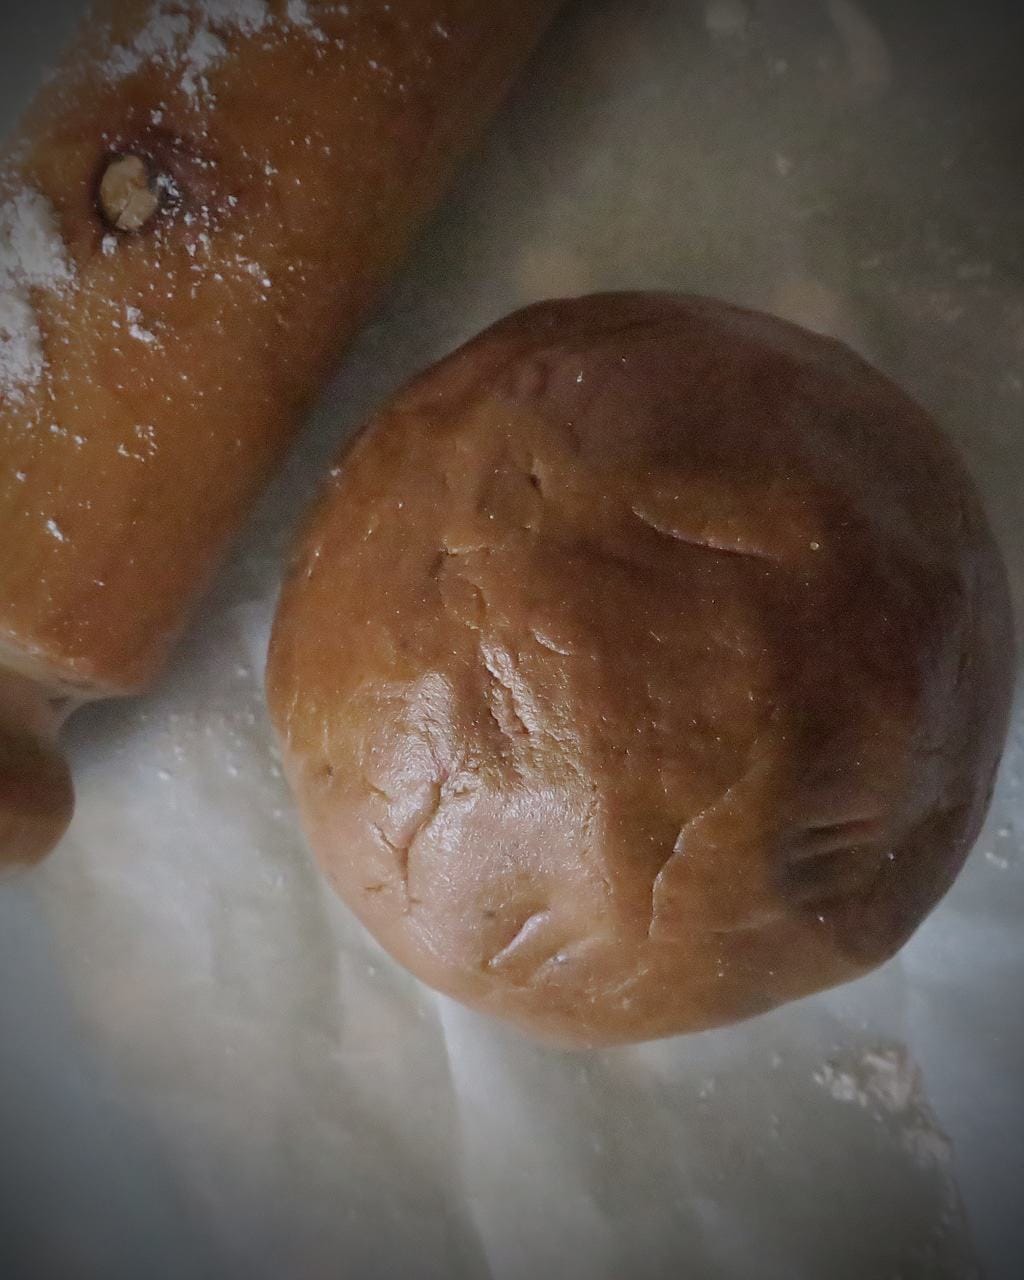
4 When all the butter is evenly mixed in, make a well in the centre and add the treacle. Bring the mixture together to form a soft dough, combining lightly until it has an even colour with not too many streaks of treacle
(I did this bit in the Kitchenaid to avoid handling it).
Lightly form into a ball.
Next
5. Divide into two and squash it into two even-sized flattish discs.
6. Place one disc of dough on a sheet of baking parchment. Begin by gently squashing the dough down with the rolling pin or your hands, cover with a second sheet of parchment then use the rolling pin to roll properly. If the top sheet crinkles, just peel it off, smooth it down gently and start rolling again. Gently roll the dough until it is 5mm thick all over.
7. Transfer the sheet of rolled dough, still sandwiched between its parchment, to a baking tray and place in the fridge to chill for at least 20-30 minutes before cutting. Repeat the process with the rest of the dough.
8. Using your cutter — I bought mine from here plus some disposable piping bags for icing — cut out the biscuits as close together as possible, lifting each one on to a parchment-covered baking tray and making sure that they are not too close together, as the dough will spread a little on baking.
9. Evenly space the trays in the oven and cook for 12-16 minutes, depending on your oven. Keep a close eye on the first couple of batches you cook until you get used to the recipes and your oven*.
This was good advice for me — mine cooked in just 10 minutes in our AGA. In fact, a couple of the edges were a little charred — have already made a note for next time!
For the royal icing
You will need:
450g icing sugar
1 egg white
1 teaspoon of lemon juice
Water
Food colouring gels
1. Beat the egg white with an electric whisk or mixer until it goes frothy.
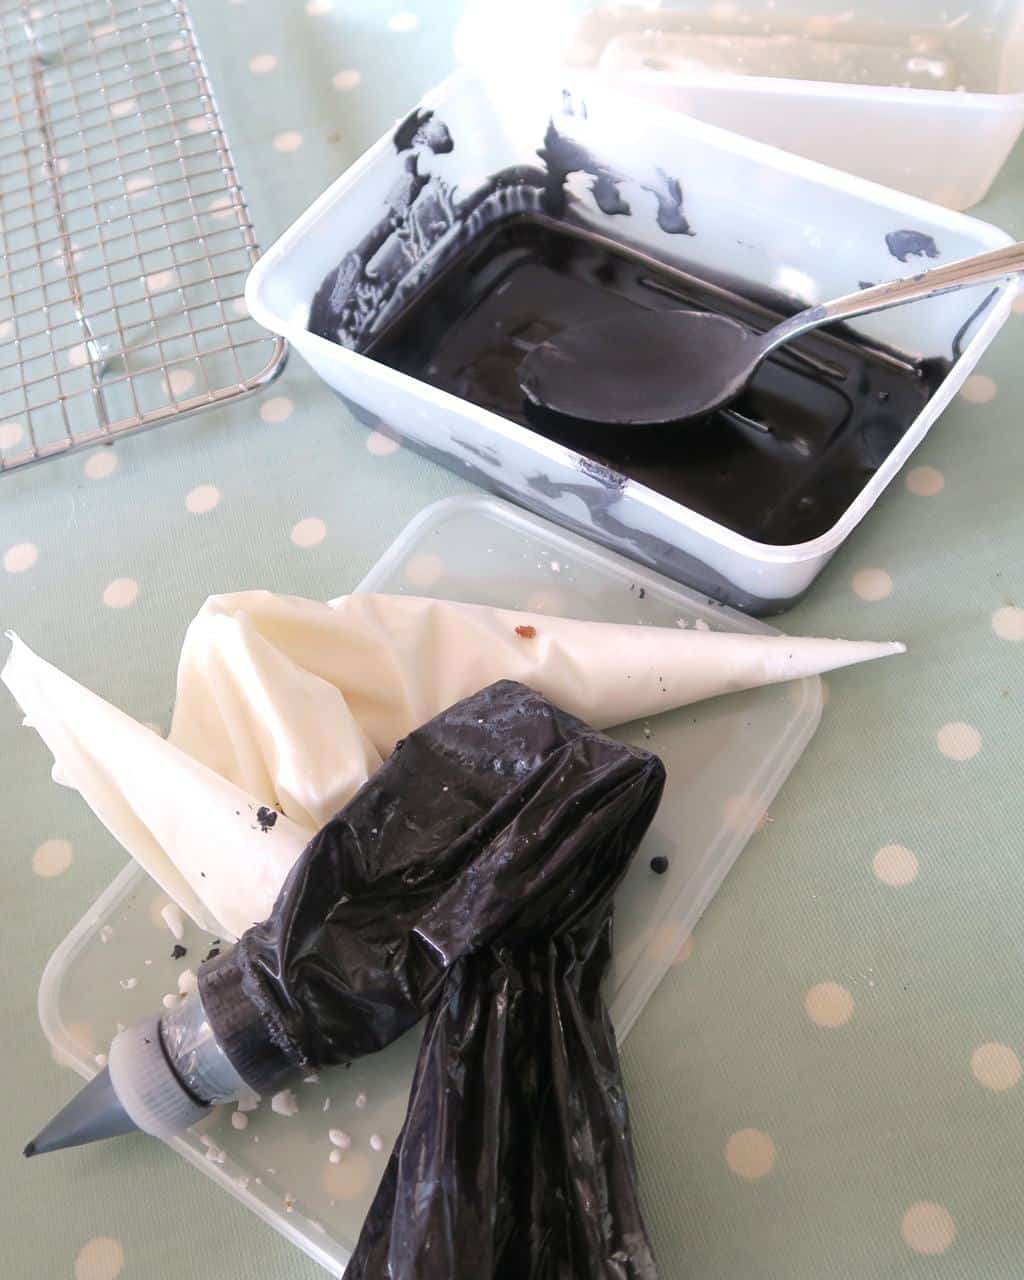
2. Then add the lemon juice, followed by the sifted icing sugar spoon by spoon, on a high speed until you have the desired consistency.
3. I make my lining icing the consistency of toothpaste. The above icing recipe was perfect for this but you can add a little water to make sure you have the right consistency.
4. Add your food colouring and mix well. Then you’re good to go!
As one of the twins had an egg allergy when he was born, I created batches of these with egg free royal icing — or Aquafaba. It’s a fantastic alternative; no perceivable difference at all.
How To Pipe
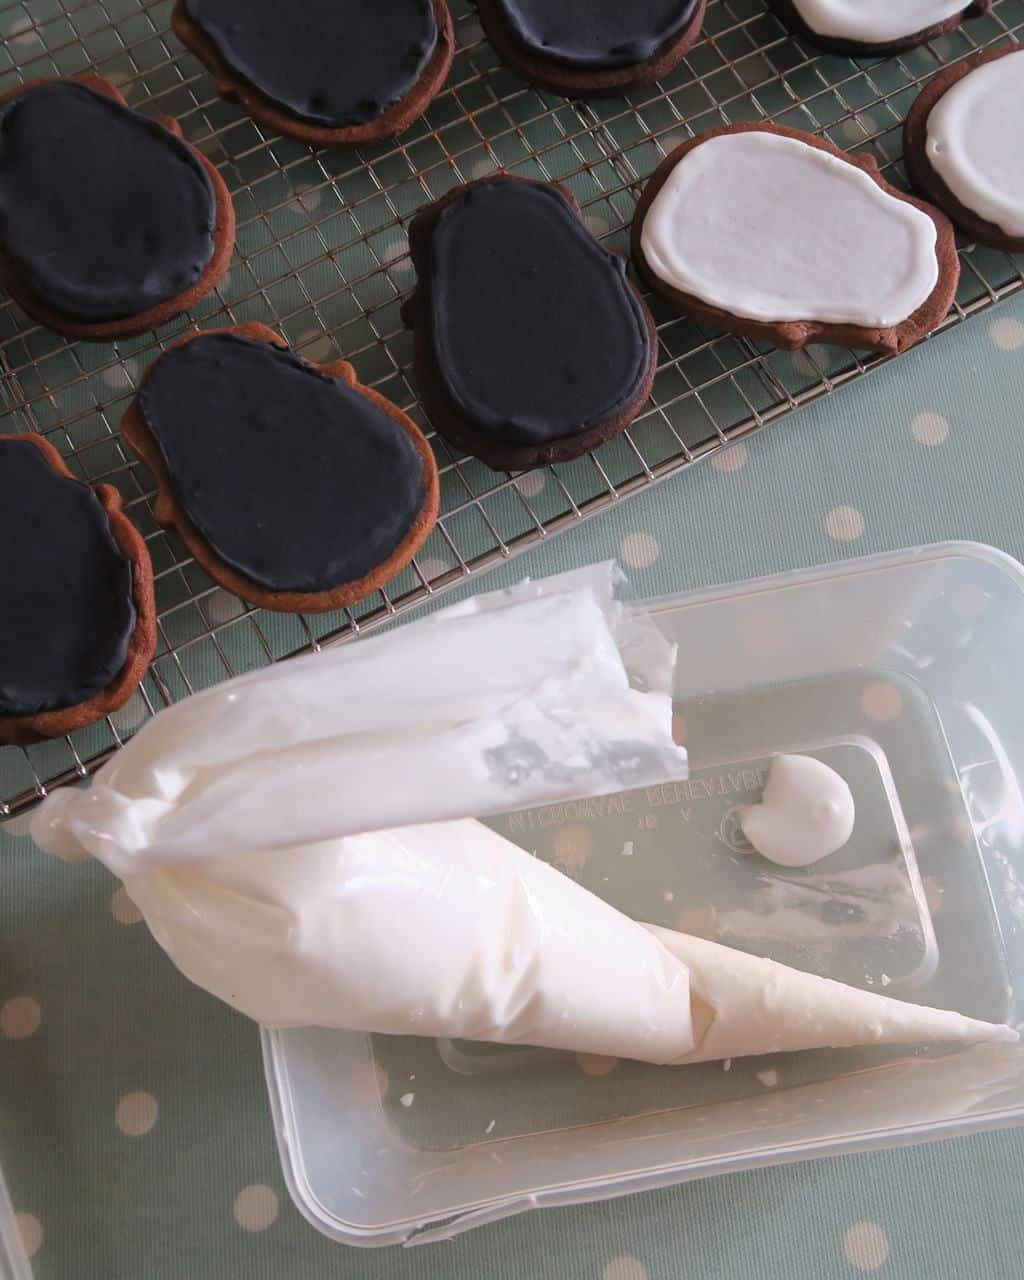
Following lots of differing advice from the experts, I made my lining icing the consistency of toothpaste.
I piped a line around the edge of the iced biscuits first — then left it to dry for 10 minutes — then to flood the background of the biscuits, I watered the icing down with a little water. This made it much easier to work with as it was much looser — almost like the consistency of single cream.
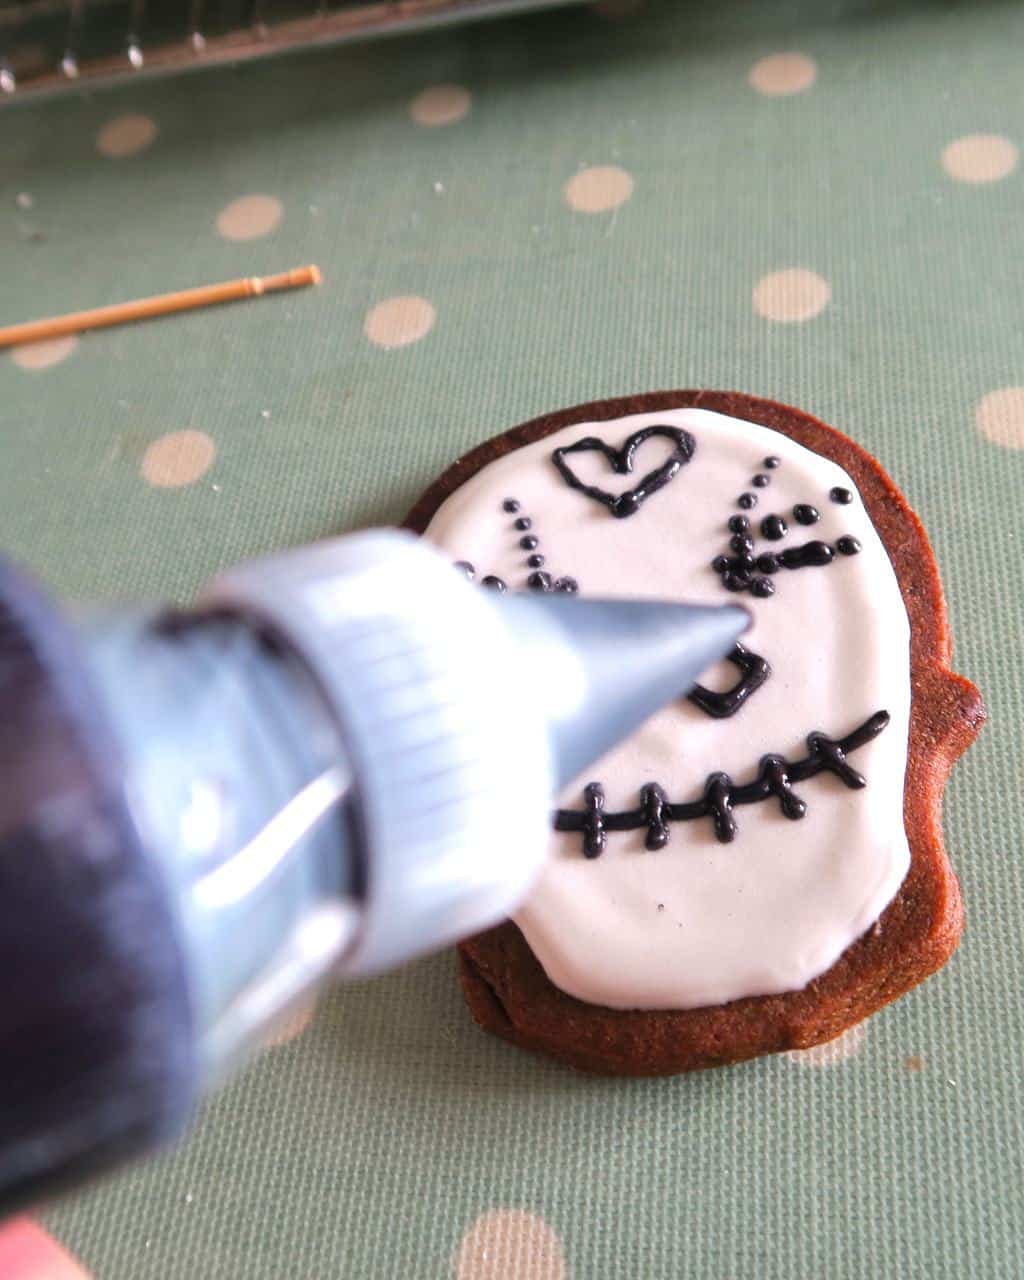
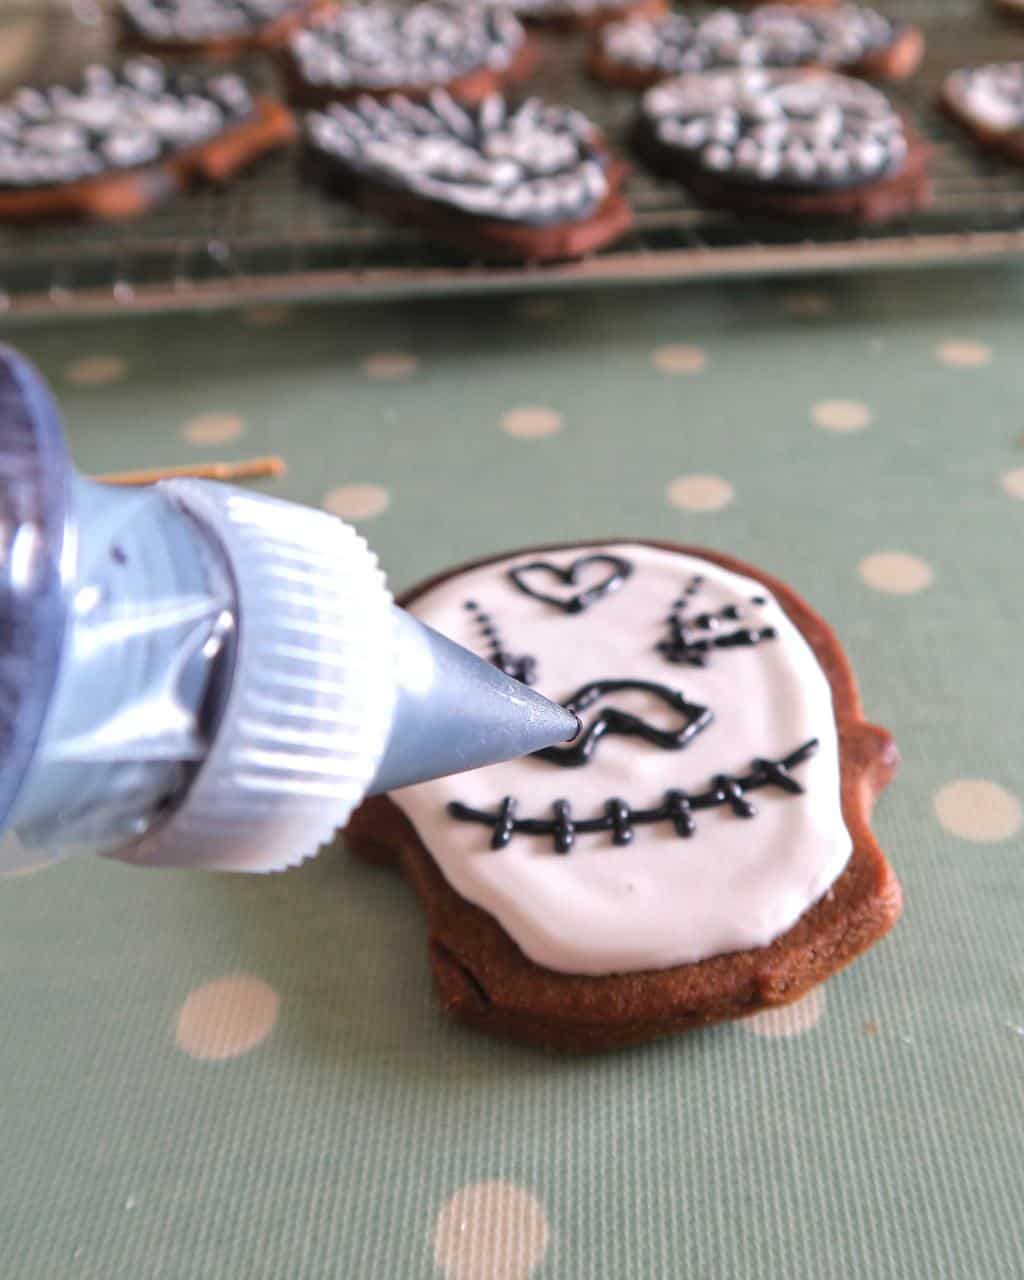
When the backgrounds were dry (leave these overnight if you have time) you can start piping the patterns on the top.
I loved this bit.
Put as many squiggles and patterns on each skull as you dare! I didn’t follow any particular template but have been pinning sugar skulls to my Halloween party Pinterest board like a crazy woman, so most of the inspiration came from there!
A New Favourite Hobby?
Over the past few years, I’ve watched SO many YouTube videos, showing how to line and flood iced biscuits but, up until now, have never had a go.
Needless to say, I think all the hours of watching other people may have rubbed off a little bit!
Learning by osmosis maybe?
I was a bit wobbly — certainly not up to the standard of the amazing YouTubers — but I really, really enjoyed it.
I think I may have found a new favourite hobby ;)
*husband runs away and hides*
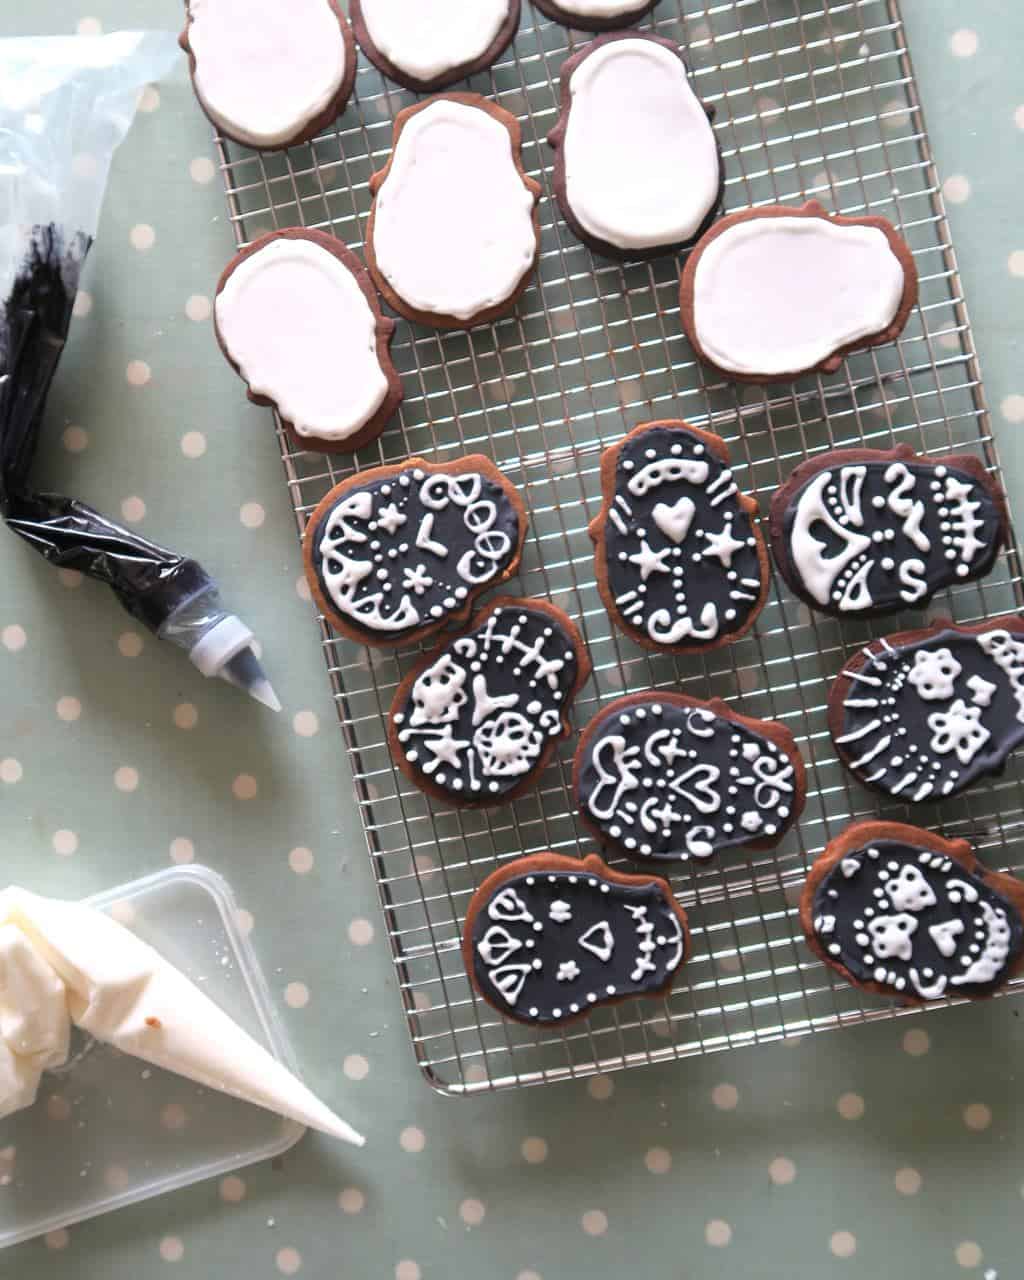
Ta-daah! Iced sugar skull cookies — done.

Print and Save For Later

Iced Sugar Skull Cookies
The perfect spooky Halloween treat. These Iced Sugar Skull Cookies look a million dollars and taste ghoulishly great!
Ingredients
- FOR THE BISCUITS
- 200g plain flour
- ½ teaspoon baking powder
- half a teaspoon ground ginger
- ½ teaspoon cinnamon
- half a teaspoon mixed spice
- 100g salted butter softened and diced
- 50g black treacle
- FOR THE ROYAL ICING
- 450g icing sugar
- 1 egg white
- 1 teaspoon of lemon juice
- Water
- Food colouring gels
Instructions
FOR THE BISCUITS
1. Preheat the oven to 170C/150C fan/gas 3 before you begin making your iced sugar skull cookies or when ready to cook. I made 14 skulls — plus a tester biscuit!
2. Sift the flour, baking powder and all the spices into a mixing bowl. Add the sugar and mix well.
3. Add the butter. Using just the tips of your fingers, rub the ingredients together until they resemble fine breadcrumbs.
4 When all the butter is evenly mixed in, make a well in the centre and add the treacle. Bring the mixture together to form a soft dough, combining lightly until it has an even colour with not too many streaks of treacle. (I did this bit in the Kitchenaid to avoid handling it).
Lightly form into a ball.
5. Divide into two and squash it into two even-sized flattish discs.
6. Place one disc of dough on a sheet of baking parchment. Begin by gently squashing the dough down with the rolling pin or your hands, cover with a second sheet of parchment then use the rolling pin to roll properly. If the top sheet crinkles, just peel it off, smooth it down gently and start rolling again.
Gently roll the dough until it is 5mm thick all over.
7. Transfer the sheet of rolled dough, still sandwiched between its parchment, to a baking tray and place in the fridge to chill for at least 20-30 minutes before cutting. Repeat the process with the rest of the dough.
8. Using your cutter — I bought mine from here plus some disposable piping bags for icing — cut out the biscuits as close together as possible, lifting each one on to a parchment-covered baking tray and making sure that they are not too close together, as the dough will spread a little on baking.
9. Evenly space the trays in the oven and cook for 12-16 minutes, depending on your oven. Keep a close eye on the first couple of batches you cook until you get used to the recipes and your oven*.
This was good advice for me — mine cooked in just 10 minutes in our AGA. In fact, a couple of the edges were a little charred — have already made a note for next time!
FOR THE ICING
1. Beat the egg white with an electric whisk or mixer until it goes frothy.
2. Then add the lemon juice, followed by the sifted icing sugar spoon by spoon, on a high speed until you have the desired consistency.
3. I make my lining icing the consistency of toothpaste. You can add a little water to make sure you have the right consistency.
4. Add your food colouring and mix well. Then you're good to go!
5. Firstly, I pipe a line around the edge of the biscuit first — then leave to dry for 10 minutes. To flood the background of the biscuits, water your icing down with a little water. This will make it much easier to work with.
When the backgrounds are totally dry (leave these overnight if you have time) you can start piping the patterns on the top with more lining icing.
Notes
I make my lining icing the consistency of toothpaste and the flood icing the consistency of single cream.
Nutrition Information
Yield 16 Serving Size 1Amount Per Serving Calories 225Total Fat 6gSaturated Fat 4gTrans Fat 0gUnsaturated Fat 2gCholesterol 14mgSodium 87mgCarbohydrates 41gFiber 0gSugar 29gProtein 2g
Calculations was calculated by Nutritionix and is approximate

Caro Davies is a former art-director turned writer and content-creator, and editor behind UK lifestyle blog The Listed Home. She writes about home-related topics, from interiors and DIY to food and craft. The Listed Home has been featured in various publications, including Ideal Home, Grazia, and Homes & Antiques magazines.
